

You land in a foreign country after a long flight, ready to explore. You comfortably turn off Airplane Mode on your smartphone, anticipating instant connectivity. Almost immediately, your device displays four full signal bars or perhaps even a 5G icon at the top of the screen. You open your web browser or messaging app, but nothing loads. You are stuck without any maps, translation tools, or ride-hailing services. This scenario triggers immediate panic for countless travelers worldwide. This situation creates deep frustration for anyone relying on travel connectivity. You are encountering a state of digital cellular isolation, despite seemingly robust tower reception.
The Core Mystery: Why Signal Bars Do Not Guarantee Working Internet
This extremely common problem perplexes travelers every single day upon arrival. They naturally assume that strong network reception signal icons equate automatically to working internet data throughput. However, cellular communication operates through several completely distinct layers that perform very different tasks. Understanding this technical distinction is crucial for effective troubleshooting abroad.
The Signaling Layer vs. The Packet Data Gateway Layer
First, your smartphone must physically connect with a local cell tower to establish a basic signaling channel. When successful, the tower acknowledges your device’s identity, allowing you to see full signal bars. Therefore, these indicators solely confirm raw radio connection strength between your phone and the network.
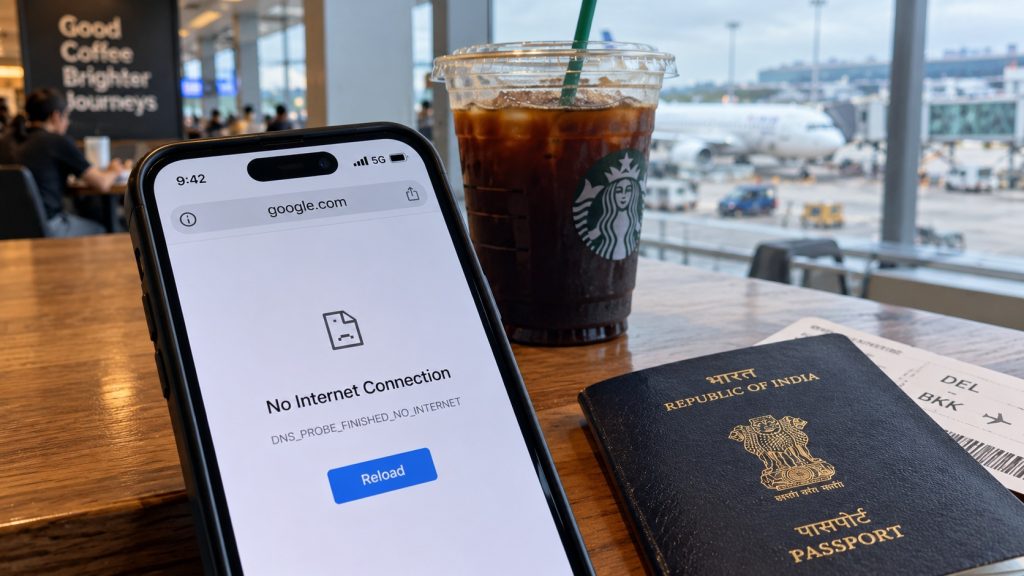
Second, for internet access to function, your device requires authorization to send and receive data packets. This connection, known as PDP (Packet Data Protocol) context, acts as your data gateway. A network can accept your physical radio signal but deny you a working data pipe simultaneously. As a result, your device displays full signal bars while suffering a complete cellular data blackout. This disconnect explains why you see the bars, but Safari or Chrome fail.
Why Toggling Airplane Mode Rarely Solves the Root Problem
Many basic online guides suggest toggling your device into Airplane Mode for ten seconds. Alternatively, they might simply tell you to restart your phone completely before trying again. While these quick remedies refresh your tower connection, they almost never address underlying gateway configuration failures.
Toggling airplane mode forces your smartphone to break and immediately reconnect its physical signaling channel. It does not resolve PDP authorization errors, missing network access point details, or IP gateway rejections. To restore working data throughput, you must dive much deeper than a simple network refresh.
Fix 1: Turn On "Data Roaming" Specifically for Your Travel eSIM
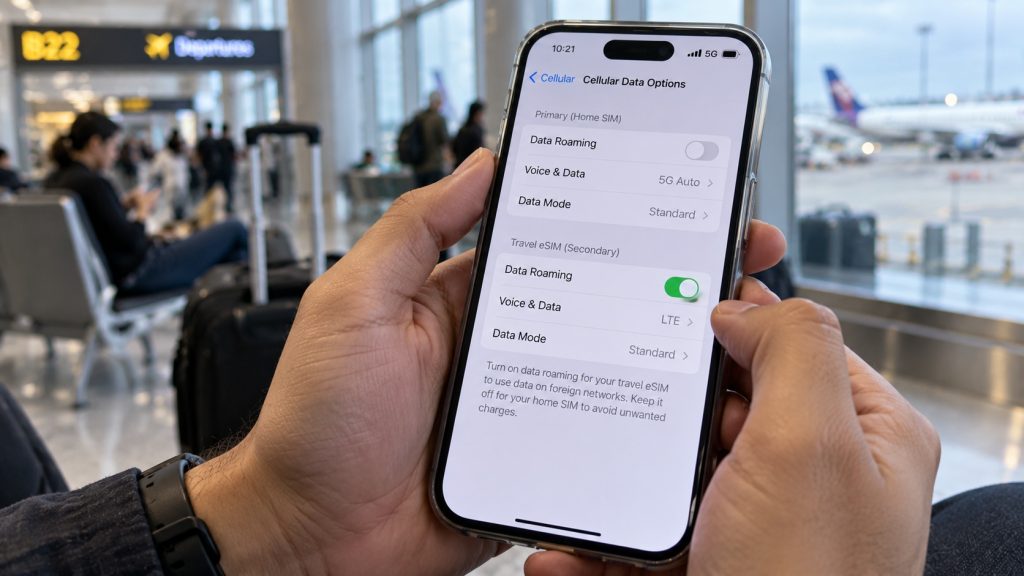
Travel eSIMs require the “Data Roaming” toggle to be explicitly switched ON. This toggle creates a secure internet gateway authorization over foreign telecom infrastructure. Furthermore, as long as data roaming remains OFF on your primary domestic SIM, you will not trigger any charges on your home line.
The Dual-SIM Roaming Paradox Explained
Many international flyers feel terrified when they see the words “Data Roaming” active on their handset. They associate that toggle with receiving a five-hundred-dollar phone bill from their home carrier upon returning. Consequently, they avoid enabling it, inadvertently crippling their newly purchased digital travel line completely.
The unique Dual-SIM architecture of modern smartphones has created a strange operational paradox. To use an international travel eSIM, you must allow it to roam onto foreign partner networks. The travel profile acts as the dedicated pipe that leverages local infrastructure for all data traffic.
Verifying the Toggle on iPhone and Android
Fortunately, you can verify this crucial setting very easily on both iOS and Android platforms:
- On iPhone: Navigate to Settings > Cellular, select your travel eSIM profile, and ensure Data Roaming is toggled ON.
- On Android: Go to Settings > Connections > Mobile Networks or SIM Manager, choose your eSIM, and switch Data Roaming to ON.
You must remember to keep data roaming OFF specifically on your primary physical home SIM. This simple setting prevents accidental data leakage to your domestic carrier, ensuring you only spend from your travel data bucket.
Note: Explore our YouTube channel — from step‑by‑step technical setup videos to immersive travel stories.
Fix 2: Assign the Correct Default Cellular Data Line
A common pitfall for Dual-SIM users involves leaving the device pointing toward the wrong cellular connection. If your handset is still attempting to pull internet data from your inactive domestic SIM, your travel eSIM cannot work. Your phone display might show full signal for both lines, confusing your troubleshooting priorities.
How "Allow Cellular Data Switching" Silently Breaks Your Connection
Both Apple iOS and Android devices include intelligent network features designed to provide continuous, unbroken connectivity. On an iPhone, this feature is explicitly labeled “Allow Cellular Data Switching” within the cellular settings menu. It sounds helpful, but it introduces a major conflict during foreign travel scenarios.
This feature automatically shifts internet routing between your two SIM profiles based on tower signal availability. If your primary domestic line still has basic signaling but no data roaming pack, your phone will try to use it silently. This loop creates continuous data timeouts, preventing you from ever establishing a PDP session with the correct travel provider.
Locking Data Strictly to the Travel eSIM Profile
You must manually dictate which SIM profile handles all internet traffic during your trip. Restoring data access usually requires navigating directly to your phone’s cellular or SIM management dashboard. You then need to explicitly select the travel eSIM as your only preferred “Mobile Data” or “Cellular Data” source.
Furthermore, remember to turn off the automatic data switching option completely until you return home. Locking the cellular data pipe ensures your smartphone doesn’t waste battery and bandwidth trying to draw data from an empty well.
Fix 3: Manually Configure Your APN (Access Point Name)
When you insert a traditional physical SIM card, your phone usually auto-populates critical network routing instructions. These vital instructions are contained within an Access Point Name, commonly known as an APN. However, many digital travel lines require manual APN entry before they can connect you to the internet.
Why Travel eSIMs Fail to Auto-Populate Network APNs
Traditional carriers push APN settings Over-The-Air using network signaling packets that are specific to the domestic core infrastructure. Digital travel profiles, known as MVNOs (Mobile Virtual Network Operators), frequently roam across multiple host networks simultaneously. These diverse hosts often require distinct APN identifiers that your device cannot download or guess automatically.
When your APN configuration remains blank or contains incorrect legacy data, your smartphone’s data requests go unanswered. Think of an APN as the unique gateway address your phone needs to navigate onto the public internet. Without it, your phone cannot connect, even when tower signal bars remain completely full. This mismatch is a very frequent underlying cause for a travel eSIM showing no data abroad.
Step-by-Step Manual APN Setup for iPhone (iOS)
Setting up an APN manually on an iPhone might feel intimidating, but the click path remains very straightforward.
- Open Settings and select Cellular (or Mobile Service).
- Tap directly on your active travel eSIM profile.
- Choose Cellular Data Network or Mobile Data Network within the submenu.
- You will see multiple fields: APN, Username, and Password under both “Cellular Data” and “LTE Setup.”
- Contact your eSIM provider for the exact APN value (e.g., globaldata or roam.net) and enter it precisely into the APN field.
- You do not need to fill in any other fields unless your provider gives you specific credentials.
Note: Explore our YouTube channel — from step‑by‑step technical setup videos to immersive travel stories.
Step-by-Step Manual APN Setup for Samsung & Android
Configuring Access Point Names on an Android device allows for deeper technical customization:
- Navigate to Settings and select Connections (or Network & Internet).
- Tap on Mobile Networks and then choose Access Point Names.
- Ensure your travel eSIM is selected at the top, then tap ADD.
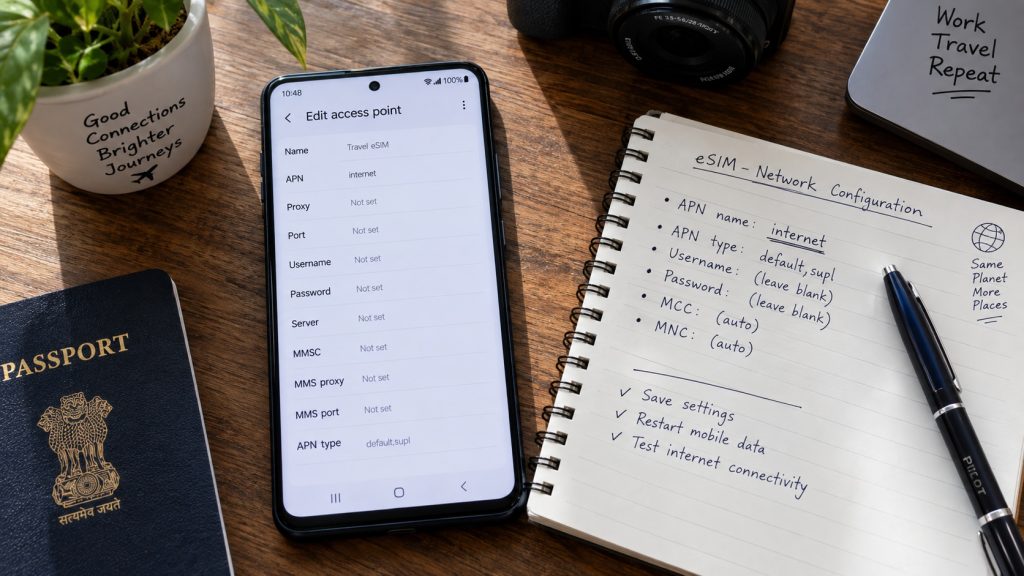
- Enter any description in the Name field (e.g., “Hubbing eSIM”).
- Tap APN and enter the exact APN address provided by your carrier.
- Ensure the APN Type field contains the mandatory value: default,supl. This value tells the phone this APN handles standard data and GPS services.
- Tap the three dots in the corner and select Save. Ensure the new APN radio button is selected.
Note: Explore our YouTube channel — from step‑by‑step technical setup videos to immersive travel stories.
Fix 4: Break the "Automatic Network Selection" Trap
Your smartphone aggressively attempts to remain connected to the best available network signal at all times. By default, it uses a feature known globally as “Automatic Network Selection” to manage tower connections. While excellent at home, this agnostic tower approach fails dramatically during complex international roaming scenarios.
Why Your Phone Connects to the Wrong Local Tower
Your travel eSIM is authorized to connect with specific local carrier infrastructure under pre-negotiated roaming agreements. However, another unauthorized network tower might have a stronger radio signal at your precise airport location. Consequently, your handset latches onto that non-partner tower with full signal bars, only to have all data authorization requests rejected instantly.
This mismatch creates the frustrating scenario of strong tower bars with zero internet throughput. Your phone assumes a radio link guarantees a data pipe. You must correct your device’s tower assignment manually to force authorization with the contracted partner network.
How to Manually Lock onto an Authorized Partner Carrier
Restoring internet access often requires taking cellular tower control away from your smartphone entirely.
- Open Settings on your device and navigate to Cellular (iPhone) or Mobile Networks (Android).
- Select your travel eSIM profile.
- Tap on Network Selection or Carrier and disable the “Automatic” toggle.
- Your device will begin a long search for all available local networks; this process takes roughly two to five minutes.
- Once the search completes, you will see a list of every nearby carrier (e.g., du, Etisalat, AIS, O2).
- Select one of the authorized local networks recommended in your eSIM installation guide or welcome email.
Your device will lock onto that specific carrier network exclusively, avoiding unauthorized signal traps. This manual network selection fix resolves many cases where the travel eSIM connects to a tower but cannot work.
Fix 5: Disable VPNs and Apple iCloud Private Relay
Travelers often activate VPN applications to secure their data and bypass content blocks on public Wi-Fi networks. Additionally, many iPhone users leverage a native security feature known as iCloud Private Relay, which encrypts DNS requests. These encrypted data tunnels can cause catastrophic connection conflicts over foreign cellular roaming gateways abroad.
Why Foreign Roaming Gateways Reject Encrypted Tunnels
A Virtual Private Network creates a secure, encrypted tunnel that obscures all internet traffic from the host network. International cellular gateways must inspect certain aspects of incoming IP packet headers to properly authorize the data session. When your device wraps every packet inside an opaque encrypted tunnel before it even reaches the telecom gateway, authorization fails.
Foreign carrier gateways interpret these obscure encrypted data sessions as unauthorized PDP context requests. They will immediately reject the data throughput, even though the raw radio signaling channel (signal bars) remains active. Therefore, your browser reports DNS errors while your phone displays full 5G bars simultaneously. Disabling any active VPN is often a necessary initial step in restoring a travel eSIM no internet connection.
Removing Lingering VPN Configuration Profiles
Simply closing your VPN application might not be enough to resolve the data blockage completely. Lingering VPN system profiles inside your device settings can still attempt to hijack outgoing cellular traffic.
- On iPhone: Navigate to Settings > General > VPN & Device Management and delete any non-essential profiles.
- On Android: Go to Settings > Connections > More connection settings > VPN and ensure none show a status of “Connected” or “Always-on.”
Furthermore, disable Apple iCloud Private Relay within your iCloud settings until your travel connection is fully restored. These simple steps eliminate hidden technical routing bottlenecks that silently strangle cellular data throughput.
Fix 6: Switch From 5G to LTE and Adjust APN Protocols
While 5G technology provides blazing speeds at home, it can introduce serious instability during international roaming. Roaming 5G requires a successful, complex handshake across several different international gateways and local tower configurations. If even one aspect of that chain fails, your connection stalls completely.
The Unstable Roaming 5G Handshake Problem
You might land and see a vibrant “5G” icon with full signal bars, signifying a strong local radio link. However, your device might fail to establish a stable PDP context because the 5G data gateway authorization timed out. This gateway negotiation takes significantly longer over unstable foreign infrastructure than simpler 4G connection protocols.
Forcing your device to connect exclusively over 4G/LTE often creates an immediate, stable data gateway authorization abroad. Open your cellular settings dashboard and select the Voice & Data (iPhone) or Preferred Network Type (Android) submenu. Change the preferred network setting from 5G explicitly down to LTE or 4G.
Setting APN Protocol to IPv4/IPv6 Dual-Stack
Another common but highly obscure data blockage results from IPv4 and IPv6 network protocol mismatches. While local SIMs navigate these protocols effortlessly, international travel eSIM profiles sometimes require precise manual instruction. Many older foreign gateways still operate exclusively on the legacy IPv4 data protocol.
If your APN configuration defaults exclusively to the modern IPv6 standard, the local gateway might reject all incoming data requests. You must manually ensure the APN Protocol field (on Android devices) is set to IPv4/IPv6. This dual-stack instruction enables the device to communicate with older and newer gateways simultaneously.
Fix 7: Check for FUP Throttling and Carrier Activation Delays
Sometimes the reason your travel eSIM connected but has no data lies not within your phone settings, but further upstream. Two final possibilities—data consumption limits and server activation delays—can result in full tower bars with zero internet throughput.
Has Your Data Bucket Hit a Hidden Fair Use Policy Cap?
You must verify whether you have simply consumed your daily high-speed data allowance or exhausted your plan’s total bucket. Many “unlimited” international plans enforce a daily Fair Usage Policy, or FUP, to prevent excessive usage. After you burn through roughly one or two gigabytes of data, your provider throttles your speed dramatically.
While signal bars remain full, your actual data transmission speed drops to roughly 128 kbps. This crawl renders modern websites, social media video feeds, and navigation apps almost completely unusable. You might see the spinning “Connecting…” icon indefinitely, assuming the internet is broken when it is simply throttled to a standstill.
Upstream Server Provisioning: When to Contact Provider Support
A final possibility involves technical propagation delays across international telecom core networks. After you activate your digital cellular profile, your credentials must propagate to thousands of carrier home location registers worldwide. This complex server provisioning typically takes anywhere from ten minutes to one full hour upon your initial arrival.
During this brief propagation window, your device might establish a strong local tower signaling channel with full bars. However, the Packet Data Gateway cannot yet authorize your specific credentials because the required server updates haven’t arrived. If internet access hasn’t restored after waiting patiently for one hour with proper settings, you must contact your eSIM provider’s support team.
Quick Diagnostic Matrix: 7 Fixes for iPhone & Android
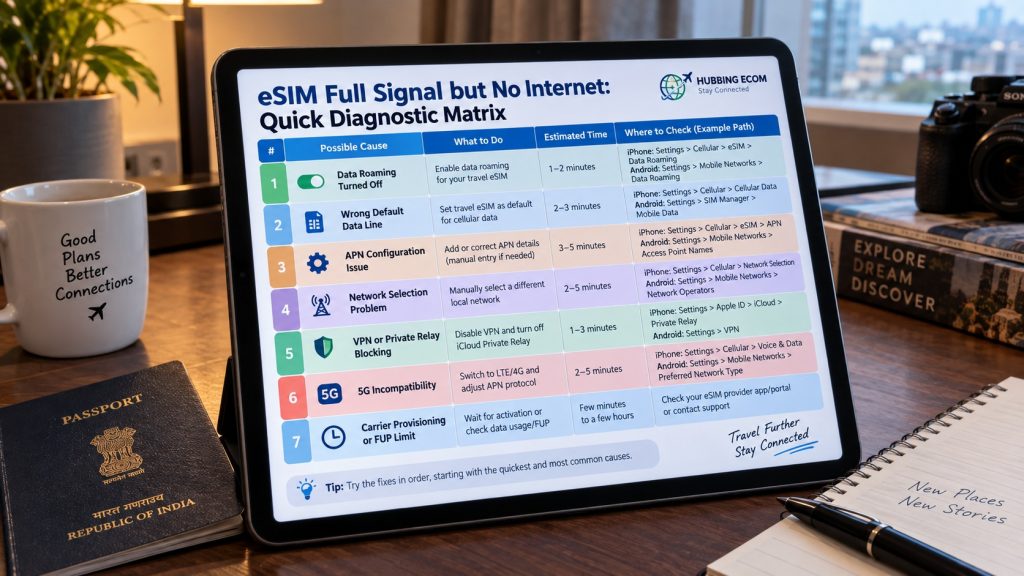
This scannable reference guide helps you quickly prioritize your troubleshooting triage after arriving at your destination airport. Follow these steps sequentially to restore internet connectivity:
Summary
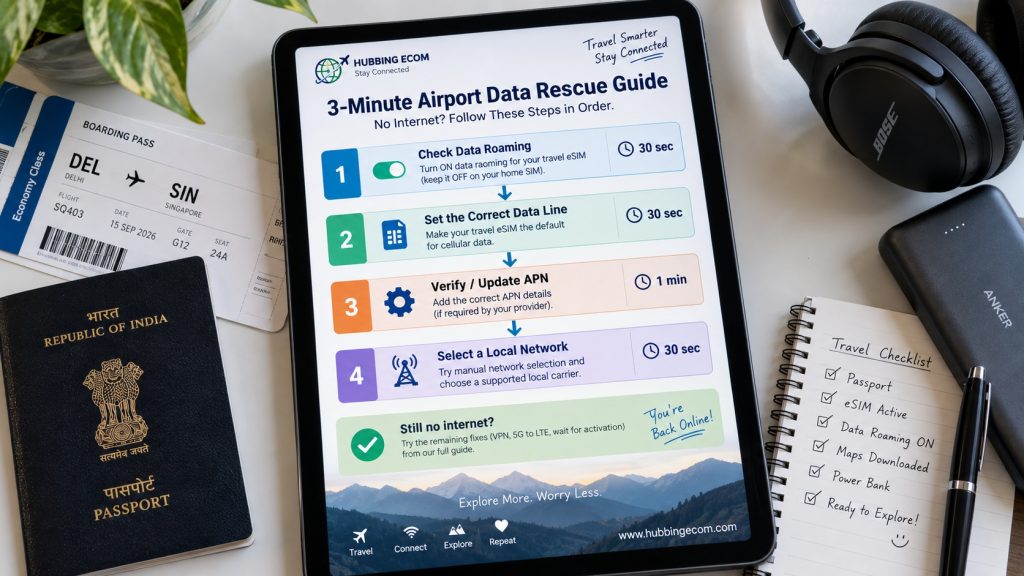
Frequently Asked Questions (FAQs)
Signal bars signify a strong radio frequency link between your smartphone and the local cell tower. Accessing the internet, however, requires a PDP (Packet Data Protocol) context gateway authorization. If your APN details are incorrect, your data roaming toggle is off, or your data line assignment points elsewhere, the gateway denies authorization, leaving you with full tower signal but zero bytes of throughput.
No, modern smartphones allow you to configure data roaming permissions independently for each active SIM profile. Enabling data roaming on your dedicated travel line will only authorize that specific profile to consume local partner data. Keep the data roaming toggle switched OFF specifically on your primary physical home SIM to prevent accidental charges from your domestic carrier.
An Access Point Name, commonly known as an APN, is the necessary technical bridge that connects your smartphone’s cellular signal pipe to the public internet gateway. While traditional local physical SIMs can automatically download and configure these instructions Over-The-Air, many digital travel eSIM MVNO profiles frequently require manual APN entry before they can route any cellular data traffic.
Travel eSIM cellular data must be routed, inspected, and authorized by foreign telecom roaming gateways before accessing the internet. Active VPNs and Apple iCloud Private Relay wrap all IP packet traffic in heavy encryption. This obscure encrypted data session is frequently rejected by the foreign roaming data gateway, which interprets it as unauthorizedPDP context traffic, resulting in the DNS timeouts travelers experience abroad.
Yes, executing a “Reset Network Settings” on your iPhone or Android handset is a common technical troubleshooting step that clears saved Wi-Fi networks, Bluetooth pairings, and APN caches completely. However, this process will NOT delete your installed digital travel eSIM cellular profiles, provided you are careful not to select any subsequent submenu option asking to erase your digital SIMs or eSIMs.
You May Like Reading Similar Blogs
eSIM vs Pocket WiFi vs International Roaming: Which Is Best for Your Trip in 2026?
Day Pass, Unlimited or Fixed Data eSIM: Which Plan Is Best for Your Trip?
Best eSIM for Indian Travelers Going Abroad: Complete 2026 Guide
How to Keep Your WhatsApp Number Active While Using a Travel eSIM
Top 15 Things to Do in Langkawi
Should I Install My eSIM Before Travel or After Landing?
eSIM for Short Layovers and Airport Transit: Do You Really Need Data for 2–6 Hours?
eSIM for Digital Nomads and Remote Workers
eSIM Security and Privacy: Is Your Data Safe When Traveling?
Best eSIM, Physical SIM for Southeast Asia: Nepal, Sri Lanka, Philippines, Bali Compared
Best Asia eSIM for Indians, NRIs and International Tourists: Travel Across 20 Plus Countries
Affordable eSIM for Singapore: Safe High‑Speed Data for International Tourists
Is ‘Unlimited’ eSIM Really Unlimited? The Truth About Throttling & Hidden Data Limits
How Much eSIM Data Do I Really Need? A Calculator for Every Type of Traveler
Complete eSIM Troubleshooting Guide — Why It’s Not Working & How to Fix It
How to check eSIM Data usage on iPhone?
Why you should use eSIM and Wi-Fi Map in conjunction? On your international trip..
Does a VPN Work with Travel eSIM? Common Problems, Fixes & Tips
Subscribe to our YouTube channel and follow us on Instagram for more updates.

Leave a comment